DIY Paper Carnations

I have never much liked paper flowers and never tried making one until I found these amazing paper carnations. Might be my love for pretty carnations could not stop me from making them. It is pretty easy to make these flowers.

image

All you need is crepe paper, floral tape, craft wire, scissors, white glue and water colour. Below are the steps.

image

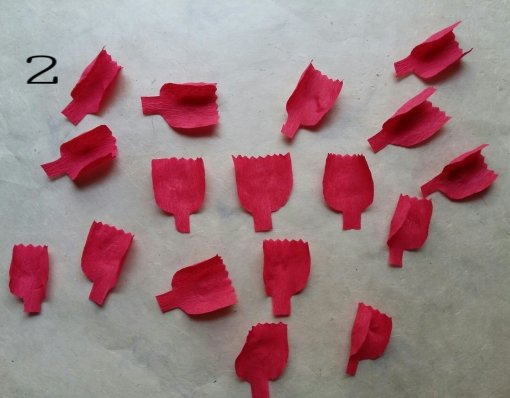
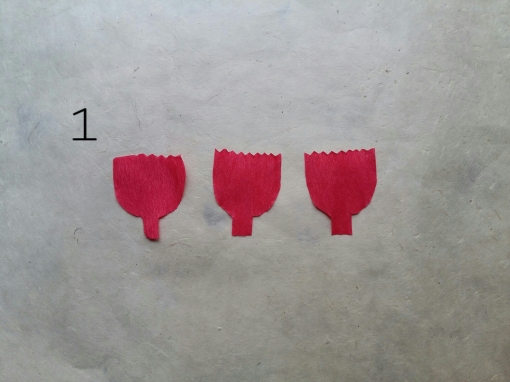
1. Take a crepe paper (preferably red or pink or white in colour) and cut it into tulip shaped petals (around 16 to 20 petals). Please note that the creases of the crepe paper should be kept vertical and the tip of the petal should be cut zigzag.

image

2. Stretch the cut petals and cup them. The vertical creases should spread while doing this making it easy for you to cup the petals.

image

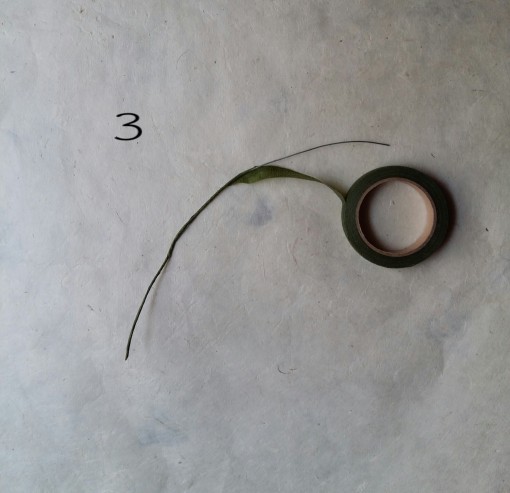
3. Take the craft wire and cover it with a floral tape.

image

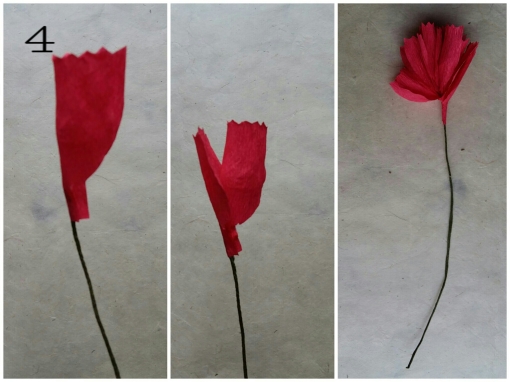
4. Apply very little amount of white glue on one end of the wire and stick your first petal followed by the second, third and other remaining petals. Please note that you should apply little amount of white glue after sticking every petal.

image

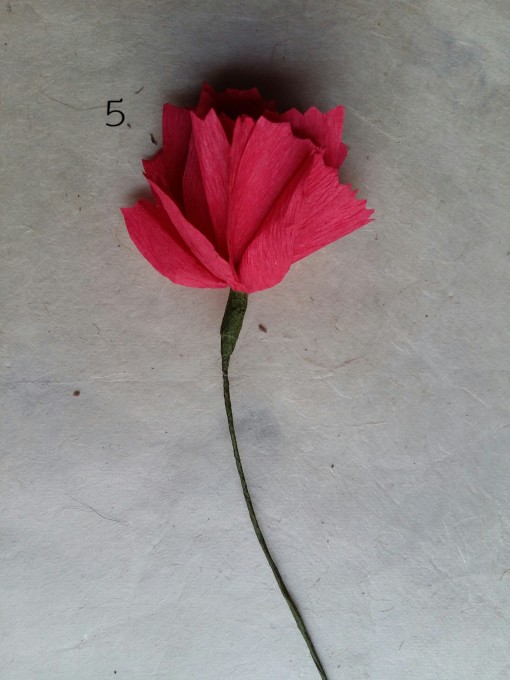
5. Cover the area where the petals have been glued with the floral tape.

image

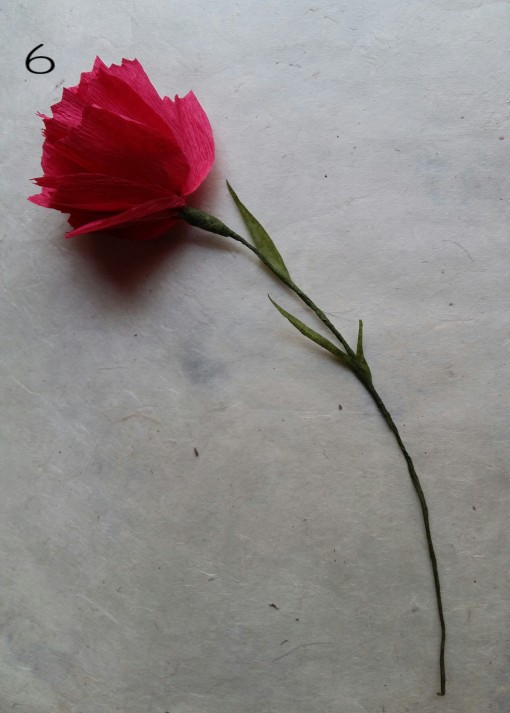
6. Take a green crepe paper and cut it into pointed leaves and glue them on the stem where ever necessary.
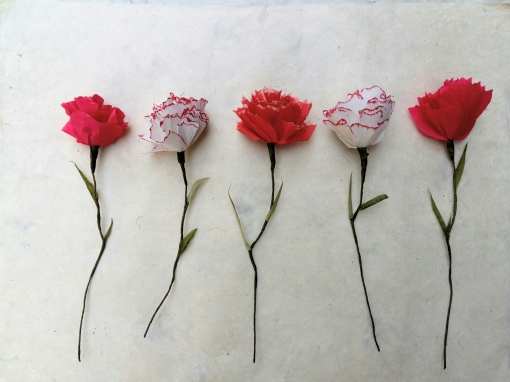
For the white carnations, apply little amount of red water colour on the zigzag tip with a brush.

image

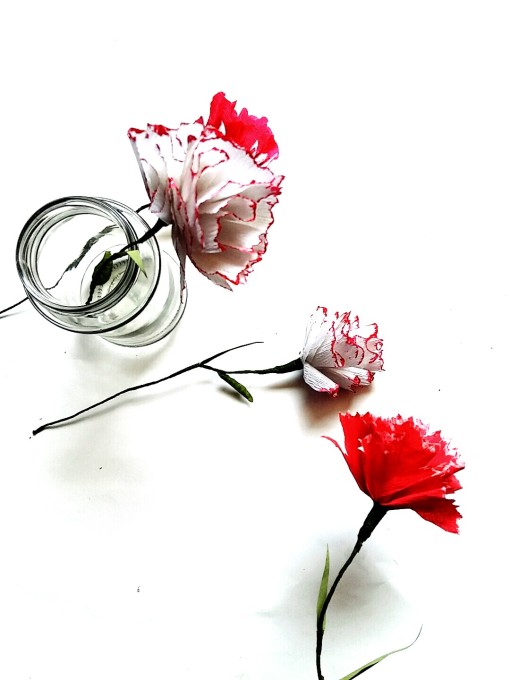
Your paper carnations are ready!
Thank you for staying. Enjoy making these pretty carnations!

[NOTE : All pictures appearing on this site are property of knitters and crocheters. Republishing or distribution of these without any permission of the owner is not permitted. ]
DIY: Origami Heart Bookmark

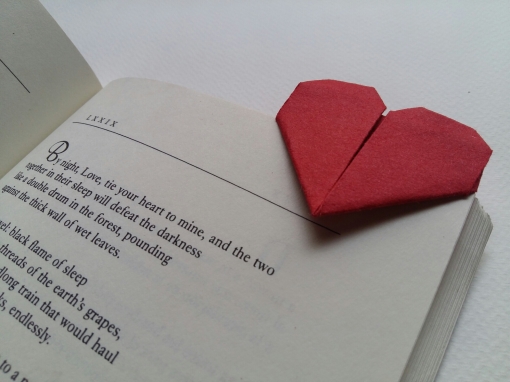
It’s been quite sometime that I haven’t posted DIY idea(s). My earlier posts have been about travel and photography. Now its time for a DIY. This pictorial guide will feature steps on how to make an easy origami heart bookmark.
Origami is an art of paper folding associated with the Japanese culture.
Origami heart bookmarks are easy and fun to make and suitable for beginner crafters and children.

image

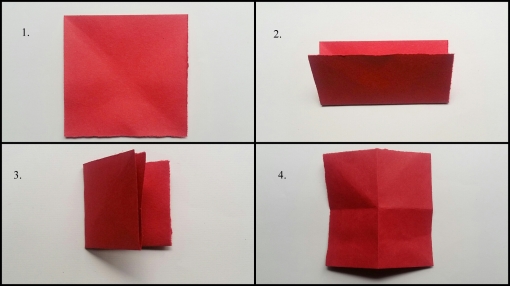
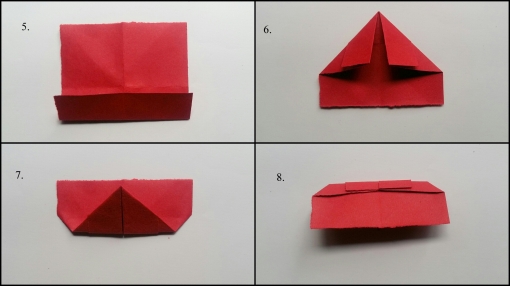
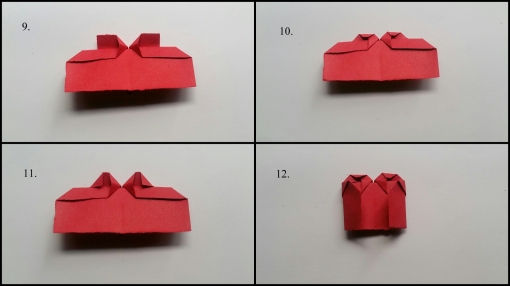
Wondering how to make it? Below is the pictorial guide.
Please note: The paper piece should be square. My piece measures 10 cm x 10 cm.

image

image

image

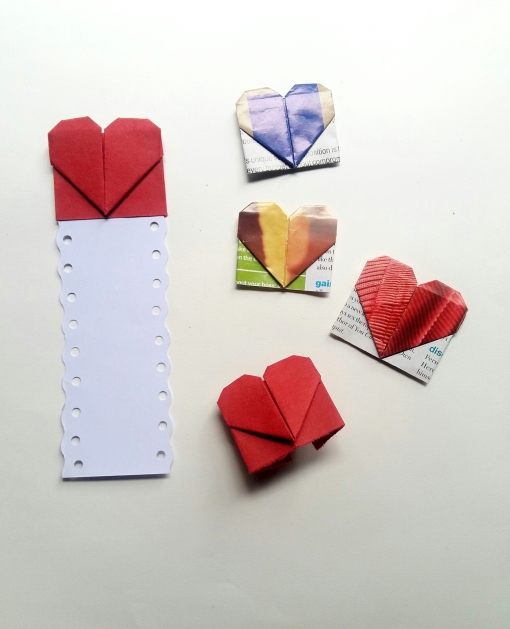
As you finish all the steps, your origami heart bookmark is ready. However, I have glued it to a cardstock paper in order to make it more durable. I made some from magazine pages too.

image

Thank you for staying. Hope you liked it.
[Note : All pictures appearing on this site are a property of knitters and crocheters. Republishing or distribution of these without any permission of the owner is not permitted.]

DIY: Paper Pens [Pictorial Guide]

Paper pens are something very easy to make. It was during one of the solid waste management workshops that I came across the idea of making pens out of magazine pages. All you need is a pen refill / cartridge, a magazine page, glue stick, white glue (I use Fevicol) and scissors. 

5

Below is the pictorial guide.

1

2

3

Your Paper Pen is ready!

4

Thank You for staying. Hope you will make one 🙂

IMG_1677

IMG_1681

[*Mamtalaya is a Short Stay Home in Gangtok, East Sikkim, India, which shelters (female) victims of physical, social and sexual abuse.]

[Note: All pictures appearing on this site is a property of knittersandcrocheters. Please do not use them for commercial purposes]

DIY: Pompom bookmark

I came across the idea of making pompom bookmarks while searching for ideas over the internet on how to creatively use leftover yarn. Pompom bookmarks are easy and fun to make. If you have a friend who loves to read, then pompom bookmark serves as a perfect gift for them. Or if you love to read, make one for yourself. In my case, all my books now own a pompom bookmark.

Things you need: Leftover yarn and scissors.

IMG_0922

Below is the pictorial guide:

1

2

3

4

Your pompom bookmark is ready!

IMG_0949

IMG_0961 IMG_0962

Hope the steps were understandable. Do share if you make one.

Thank You for staying. 🙂

[Note: All pictures appearing on this site is the property of knitters and crocheters. Please do not use them for commercial purposes]

DIY: Magazine page gift decorative [Pictorial guide]

If you love putting extra effort while gift wrapping surprises for your loved ones, then this DIY is a must try for you. All you need is a magazine page and glue. I have used a single coloured magazine page, while you can make it with multi coloured pages or any way you like it to be. Below is the pictorial guide.

1

2

3

4

So, this is how I use them

IMG_2020

Instead of using the regular gift wrappers, I choose to wrap my gifts in a newspaper. It compliments the decorative. My friends say it’s a cheap idea which looks classy 😀

IMG_2007 IMG_2008

Hope the steps were understandable. Do share if you make one 🙂

Thank You for staying.

[Note: All pictures appearing on this site is a property of knitters and crocheters. please do not use the ideas and pictures for commercial use]

DIY: Recycled Tote Bags

A tote bag is a large and often unfastened bag with parallel handles. Today I share with you three easy ideas to make your own recycled tote bags. These are easy to make and proves very handy. You can decorate your recycled tote like I have done with these.

Got an old umbrella? Transform it into a tote bag!

[P.S. I have also made an attached pouch to keep the tote just like those we get in the market]

IMG_1973

Did you wear your favourite pair of jeans until it started to wear off? Transform it into a tote bag!

IMG_1951

Fed up of empty rice bags? Don’t know how to do away with it? Transform it into a tote bag!

IMG_1966Hope you will make one.

Thank you for staying 🙂

[Note: All pictures appearing on this site is a property of knittersandcrocheters. Please DO NOT use the ideas and pictures for commercial purpose]

DIY: Recycled cell phone holder (Pictorial guide)

Now since spring is approaching and the winter lotion bottles emptied, why not do away with it (empty bottles) creatively.

[The actual idea of making a cell phone holder out of empty lotion container was shared to me by one of my friends who asked me to make one for her.]

You can either hang the cell phone holder or simply keep it on the table. However, I recommend you to hang it.

Things you need:

  • Empty lotion (plastic) container
  • Sand paper
  • Glue
  • Cotton fabric
  • Punching machine
  • Scissors

IMG_1844STEPS:

for good news

IMG_1873

Hope the pictorial guide was understandable. Do post if you make one.

[Note: All pictures appearing on this site is a property of knittersandcrocheters]

What a wonderful world!!!

“…I see skies of blue and clouds of white…

…The colours of the rainbow so pretty in the sky…”

oviya1

I have been decorating interior of the playroom of a nursery school. First it thought of decorating the room with Origami but I settled with Amigurumi. I wanted to make something which the kids can relate and at the same time brighten up the playroom and the kids’ mood. Here is one of my Amigurumi decorative. It comprises of a sun, clouds, rainbow and raindrops. It proves to be a great decorative for nursery schools and children’s room. You can find the free pdf pattern by clicking the link below:

http://www.instructables.com/id/Rainy-Day-Mobile/

Hope you make one 🙂

[All photographs appearing on this site are the property of knitters&crocheters]

Brooke’s Column of Leaves: Pattern

Desktop7

So far this is ‘the’ best knitting pattern I have ever found, learnt and made. Designed by Brooke Nelson, this wonderful pattern is easy to make and suits with yarn of every colour. Until now, I have knitted 12 pieces of Brooke’s Column of Leaves scarf and 2 sweaters applying this pattern. They sold like hot cakes!!! 🙂

Know the basics of knitting? You definitely can make this!

Happy knitting!!!

Brooke’s Column of Leaves Pattern (Scarf: 39 stitches)

Abbreviations:

S: Slip stitch

K: Knit

P: Purl

K2tog: Knit 2 together

P2tog: Purl 2 together

YO: Yarn Over

SKP: Slip1 Knit1 Psso (psso: Pass Slipped Stitch Over knit stitch)

P2tog tbl: Purl 2 together through back loops

Lets get started!

Cast on 39 stitches.

Knit garter stitch about some few inches (as per how big you want the borders to be)
Row 1 [Right Side]: s1, k2, SKP, yo, k2, p2, K7, k2tog, yo, k1, yo, p1, yo, k1, yo, SKP, k7, p2, SKP, yo, k4, s1 (You will have 41 stitches on your needle at the end of this row, and at the end of all RS rows.)

Row 2 [Wrong Side]: p1, k2, p2tog, yo, p2, k2, p6, p2tog tbl, p3, k1, p3, p2tog, p6, k2, p2tog, yo, p2, k2, p1 (You will have 39 stitches on your needle at the end of this row, and at the end of all WS rows.)

Row 3 [Right Side]: s1, k2, SKP, yo, k2, p2, k5, k2tog, k1, (yo, k1) twice, p1, k1, (yo, k1) twice, SKP, k5, p2, SKP, yo, k4, s1

Row 4 [Wrong Side]: p1, k2, p2tog, yo, p2, k2, p4, p2tog tbl, p5, k1, p5, p2tog, p4, k2, p2tog, yo, p2, k2, p1

Row 5 [Right Side]: s1, k2, SKP, yo, k2, p2, k3, k2tog, k2, yo, k1, yo, k2, p1, k2, yo, k1, yo, k2, SKP, k3, p2, SKP, yo, k4, s1

Row 6 [Wrong Side]: p1, k2, p2tog, yo, p2, k2, p2, p2tog tbl, p7, k1, p7, p2tog, p2, k2 p2tog, yo, p2, k2, p1

Row 7 [Right Side]: s1, k2, SKP, yo, k2, p2, k1, k2tog, k3, yo, k1, yo, k3, p1, k3, yo, k1, yo, k3, SKP, k1, p2, SKP, yo, k4, s1

Row 8 [Wrong Side]: p1, k2, p2tog, yo, p2, k2, p2tog tbl, p9, k1, p9, p2tog, k2, p2tog, yo, p2, k2, p1

Repeat these 8 rows until the scarf is the length you want. Then repeat the garter stitch for the border.

IMG_1169

 Hope the instructions were understandable.

You make click the link below for the original pattern.

http://brookenelson.com/leafscarfpattern.html

DIY: Tetrapak Purse

Ever since I have been carrying my ‘self made tetrapak’ purse, many people have been asking me (to my surprise) where did I purchase it from. And to their surprise, I tell them that it is a ‘self’ recycled purse.  

IMG_8081

The tetrapak purse can be easily made and is durable. I share with you the steps below:

Materials required:

Empty tetrapak (large)

Fabric (use only cotton fabric or jeans)

A button

Needle and thread to sew the button

A string

White glue (I have used fevicol)

Scissors

STEPS:

1. Clean the tetrapak, dry it and cut its ends (See picture below)

Rectification: Please note that the center picture is supposed to be the third picture and the third should be in the center.

Desktop2

2. Cut open the tetrapak from the center. Fold it the way you want your purse to be. (See picture below)

Desktop1

3. Sew a button on the fabric first (I have used an old cotton fabric). The button should be sewed on the part of the fabric where it will stick to the (top) flap. (See picture below)

Note: The size of the fabric should be little bigger than the tetrapak. 

IMG_8063

 4. Apply white glue (I have used fevicol, since it gives good results) all over one side of the tetrapak. (See picture below)

Desktop3

5. Stick the fabric on the tetrapak. Let it dry. (See picture below)IMG_8066

6. It should look like this. (See picture below)

IMG_8068

7. Now stick other piece of fabric to the other side of the tetrapak. Let it dry. Cut at the edges. (See Picture below)

IMG_8069

8. Take two strips of the fabric. Glue it. Fold it. Let it dry. (See pictures below)

IMG_8070

Desktop4

9. Apply glue on the folded strip. Use it to close the side ends. Let it dry. (See pictures below)

Desktop5

10. Take a string and attach it to the button. Tie it around the purse. The end result should look like below. (See the picture below)

IMG_8077

In the above purse I have used jeans. I have also made another purse out of plain black fabric. Since it looked too plain, I have made patterns with acrylic colour. 

# I used a net fabric, white acrylic colour and a sponge. 

IMG_8075

# Covered the purse with net fabric, applied colour on the sponge and pressed it over the net fabric. The result is below.

IMG_8076

I have used jeans, plain cotton fabric and printed cotton fabrics to make such tetrapak purses.IMG_8092 IMG_8090

Hope you will make one.

Thank You for staying 🙂